- 作者:老汪软件技巧
- 发表时间:2024-12-07 21:06
- 浏览量:
前言
我们都知道我们写的代码是不允许发生内存泄露的,所以我们使用C/C++语言写代码时,学会合理的分配内存和释放内存是至关重要的。下面说说有哪些可以分配内存和释放内存的方式。
malloc是分配内存的函数,返回值是void*,所以需要手动的进行类型转换free是释放内存的函数,但是不会把指针置空,所以需要自己把指针赋值为NULL,否则会出现不可预估的问题。
#include
#include
const int N = 5;
int main()
{
int* ptr = (int*)malloc(N * sizeof(int));
//malloc可以分配内存失败,失败的话返回NULL
if(ptr == NULL) return 0;
for(int i = 0; i < N; ++i){
ptr[i] = i * i;
}
for(int i = 0; i < N; ++i){
printf("%d\t", ptr[i]);
}
printf("\n");
if(ptr != NULL){
printf("释放ptr的内存,并置为NULL\n");
free(ptr);
ptr = NULL;
}
return 0;
}
new和delete
使用new分配内存会进行下面几个步骤步骤:1、分配内存空间2、调用构造函数3、返回正确的指针
使用delete释放内存会进行下面几个步骤步骤:1、调用析构函数2、释放内存3、指针置为nullptr
基本类型的分配内存
#include
using namespace std;
const int N = 5;
int main()
{
int* ptr = new int;
*ptr = 100;
cout << "*ptr = " << *ptr << endl;
if(ptr != nullptr){
delete ptr;
ptr = nullptr;
}
int* ptr_2 = new int(200); //分配内存并赋值为200
cout << "*ptr_2 = " << *ptr_2 << endl;
if(ptr_2 != nullptr){
delete ptr_2;
ptr_2 = nullptr;
}
int* ptr_3 = new int[N];
for(int i = 0; i < N; ++i){
ptr_3[i] = i *i;
}
for(int i = 0; i < N; ++i){
cout << ptr_3[i] << "\t";
}
cout << endl;
if(ptr_3 != nullptr){
delete[] ptr_3; //因为ptr_3是数组,所以需要使用delete[],如果使用delete则会导致内存泄露
ptr_3 = nullptr;
}
return 0;
}
new分配内存失败的话,会抛出std::bad_alloc异常,所以我们可以这样编写代码
#include
using namespace std;
const int N = 5;
int main()
{
int* ptr = nullptr;
try{
ptr = new int;
}catch(const bad_alloc& e){
cout << e.what() << endl;
//异常处理...
return 0;
}
*ptr = 100;
cout << "*ptr = " << *ptr << endl;
if(ptr != nullptr){
delete ptr;
ptr = nullptr;
}
return 0;
}
自定义类型的分配内存
#include
using namespace std;
class MyClass{
public:
MyClass(){
cout << "执行构造函数..." << endl;
}
void Print(){
cout << "Print()..." << endl;
}
virtual ~MyClass(){
cout << "执行析构函数..." << endl;
}
};
int main()
{
MyClass* myclass = new MyClass();
myclass->Print();
if(myclass != nullptr){
delete myclass;
myclass = nullptr;
}
return 0;
}
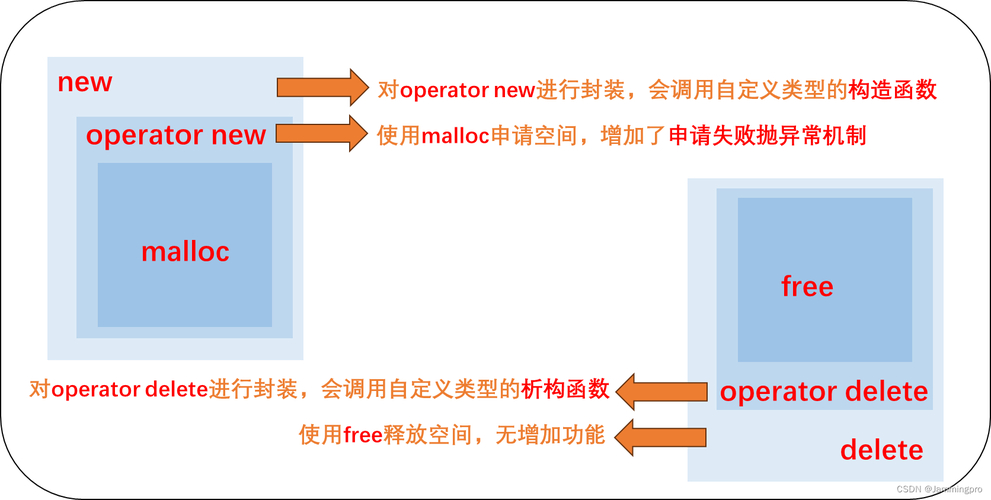
使用new和delete的注意事项有以下方面
1、new和delete必须成对使用,new和delete搭配使用,new[]和delete[]搭配使用
2、释放内存后,记得将指针置为nullptr,方式悬挂指针
3、不要多次释放内存,释放内存前记得判断是否不为nullptr才释放
4、使用指针前也需要判断是否不为nullptr才使用
上面的分配内存和释放内存都需要手动操作,稍微不小心就会忘记释放内存,或者释放内存错误,导致内存泄露,所以我们需要使用更安全的方式,智能指针,先学习shared_ptr和unique_ptr的用法
使用unique_ptr和shared_ptr
unique_ptr是独享所有权,不能被复制,只能被转移。使用于资源的独占管理的场景。shared_ptr是共享所有权,多个指针可以共同管理同一个对象,引用计数管理内存释放,当引用计数为0时,调用析构函数
#include
#include
using namespace std;
class MyClass{
public:
MyClass(){
cout << "执行构造函数..." << endl;
}
void Print(){
cout << "Print()..." << endl;
}
virtual ~MyClass(){
cout << "执行析构函数..." << endl;
}
};
int main()
{
//unique_ptr
//unique_ptr myclass = make_unique();
//shared_ptr
shared_ptr myclass = make_shared();
myclass->Print();
/* //这个就不用了,离开作用域,自动调用析构函数
if(myclass != nullptr){
delete myclass;
myclass = nullptr;
}
*/
return 0;
}
使用week_ptr
week_ptr是用来解决shared_ptr循环引用问题的,那么,什么是循环引用呢?
#include
#include
using namespace std;
class B;
class A{
public:
A(){
cout << "执行A的构造函数..." << endl;
}
virtual ~A(){
cout << "执行A的析构函数..." << endl;
}
shared_ptr b;
};
class B{
public:
B(){
cout << "执行B的构造函数..." << endl;
}
virtual ~B(){
cout << "执行B的析构函数..." << endl;
}
shared_ptr a;
};
int main()
{
shared_ptr a = make_shared();
shared_ptr b = make_shared();
a->b = b;
b->a = a;
return 0;
}
上面的代码就发生了循环引用的问题,当a和b离开作用域时,发现并没有调用析构函数,其实,从代码中就可以看出,当调用a的析构函数时,需要把a的成员变量b释放掉,而释放b就需要调用b的析构函数,而这是有需要把b的成员变量a释放掉,所以就进入了死循环。
解决这个问题,就需要到weak_ptr,因为weak_ptr不改变引用计数。只需把上面代码的其中一个shared_ptr改为weak_ptr即可,代码如下
#include
#include
using namespace std;
class B;
class A{
public:
A(){
cout << "执行A的构造函数..." << endl;
}
virtual ~A(){
cout << "执行A的析构函数..." << endl;
}
shared_ptr b;
};
class B{
public:
B(){
cout << "执行B的构造函数..." << endl;
}
virtual ~B(){
cout << "执行B的析构函数..." << endl;
}
weak_ptr a;
};
int main()
{
shared_ptr a = make_shared();
shared_ptr b = make_shared();
a->b = b;
b->a = a;
return 0;
}
如果不确定写的代码是否有内存泄露问题,那么可以使用Valgrind等工具检测是否存在内存泄露。具体用法可以自行查资料。
总结:
1、内存管理:无论是使用malloc/free还是使用new/delete,都需要手动管理内存,所以一定要确保每个分配的内存得到正确并且及时的释放,避免内存泄露。
2、智能指针:推荐使用shared_ptr和unique_ptr来自动管理内存,大大减少内存泄露的风险。
3、内存泄露检测:可以借助例如Valgrind等工具检测内存是否泄露,可以及时发现问题。